
The
 Technical Archives
This page was last updated on $Date: 1999/01/07 01:59:20 $.
Removing the Water Temperature Pickup
by Bob Haskell
This tech note applies to cars with the temperature bulb installed in
the cylinder head - cars produced from July 1958 on. Earlier cars had the
bulb installed in the radiator.
The temperature pickup is a cylindrical bulb attached to the saftey gauge
via a long capillary tube. The bulb is held in the cylinder head just under
the thermostat with a externally threaded nut. (Similar to a metal brake
line.) When the cylinder head design was changed (AEC721 to AEC960) the water
jacket was extended over the temperature pickup. This greatly reduced the
space available to even get a wrench on the nut, let alone loosen it.
Start by soaking with a liquid penatrant. A weeks worth of soaking with
new penatrant applied twice a day seems to be a typical application. Be
sure to get where the nut threads into the cylinder head and where the
capillary tube passes through the center of the nut. If the temperature bulb
and the capillary tube want to turn with the nut, make sure there's enough
slack in the capillary tube to let it wind up.
Method removals, from easiest...
- If you 're going to send the safety gauge out to be overhauled, check
with the rebuilder to see if they will replace the bulb and capillary
tube (and the magic ether). If this is the case, just cut the capillary
tube off close to the nut and use a six point socket to remove the nut.
- See if there's enough room to use a flare wrench. A flare wrench is
a six point box end wrench with a slot cut in the box to allow the wrench
to pass over brake and fuel lines.
- Time to make a special tool. Start with a 5/8 inch six point deep
socket. Either 3/8 inch or 1/2 inch drive is fine. Cut a 1/4 inch
slot about 2 long on the "nut" end. I cut the slot in one of the flats,
my thinking being that most of the bearing area is near a corner. The slot
will allow you to install the socket over the capillary tube.
To prevent the socket from slipping on the nut,
we'll use a hose clamp (worm gear type) on the socket.
Refer to the following photo.
- Install the hose clamp around the capillary tube by loosening
the clamp til the band disengages from the worm gear, slipping the
clamp around the capillary tube, and re-engaging the clamp band. For
clearance have the hose clamp nut at six o'clock facing out. Slide
the hose clamp down to the temperature bulb nut.
- Install the slotted socket. Place the capillary tube in the
slot. Place the socket through the hose clamp and on to the
temperature bulb nut.
- Making sure the hose clamp is over the temperature bulb nut,
tighten the hose clamp with a wrench.
- Attach a ratchet wrench and try loosening the nut. If you're
able to break the nut loose, remove the socket and try to remove the
nut by hand. If you have to continue with the socket, take the socket
off the nut every half turn, or so, to make sure that the capillary
tube isn't getting twisted.
If unsucessful, reconsider the first method.
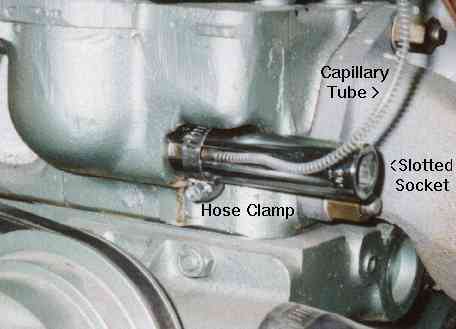
As you can see in the photo, there is very little room around the
temperature bulb nut.
Please send comments, additions, and errors for the SOL Healey web
pages to Bob Haskell.
Copyright © 1997 Team.Net
[SOL
Web
][
Scions of Lucas
 Home Page
][
SOL British Car Clubs Page
]
Home Page
][
SOL British Car Clubs Page
]