Introduction to Media Blasting
 1133 Chatmoss Dr., Va. Beach, Va. 23464; (757) 495-8229
and
Rick Remdenok (Bricklin VIN #0539,#2028, #2884)
Ruscom, Ontario Canada
1133 Chatmoss Dr., Va. Beach, Va. 23464; (757) 495-8229
and
Rick Remdenok (Bricklin VIN #0539,#2028, #2884)
Ruscom, Ontario Canada
Originally written: April 2002
Last updated: March 6, 2005
There has been some questions about sandblasting on several of the mailing list I subscribe to. So I thought I should put together a short article about sandblasting and the various equipment that is required.
 Serge Ray Berube (of Vanier, Ontario, Canada) sent the following to the Bricklin mailing
list:
Serge Ray Berube (of Vanier, Ontario, Canada) sent the following to the Bricklin mailing
list:
"I need information on sandblasting? I've never done this and my goal is to do the fender well and the frame. I can rent the equipment, but can someone please tell me what I would need to do this. What pressure should the compressor be? What grit of sand would I need? How much sand would I need? And what size of tip would I need for sandblaster? Thanks in advance. Serge"
Let me start here with some of the basics.
A compressor:
The first thing you will need is a compressor. We should really get someone to write an
article about compressors sometime as there is an ongoing debate about the two types of
home/hobby compressors. One type is: the oil less, which uses a rubber diaphragm to
compress the air; and second type is the oil lubricated, which use pistons, rings, etc. to
compress the air. There are single stage and 2 stage compressors. I haven't been able to
find much information on these diaphragm oil less compressors. Very quickly, the oilless is
louder, easier to rebuild, and cheaper than the oil lubed time.
A single stage compressor, can have one or two cylinders for compressing the air. Then the output, of both cylinders, is fed to a single tank for storage. The 2 stage compressor can compress the air to a higher pressure (Pounds per Square Inch (PSI)) than a single stage compressor. This is accomplished by feeding the compressed air from the first cylinder into the second cylinder to be compressed again. Typically a hobby-class ($300 to $1500) single stage compressor is good to about 115/125 psi while the two stage compressors can deliver up to 175 psi.
Some of the specifications you want to check when purchasing a compressor are:
 1. The horse power (hp) rating of the electric motor (i.e.. 5 hp., 10 hp., etc.). Lately, the
marketing departments of the various compressor manufactures have been playing games
with the hp ratings. It seems that they are rating them based on the maximum current the
motor will draw (when starting) and not the running current. So beware. 1 hp is about
750 Watts. So a 5 hp motor should consume about 5x750=3750 Watts or 3.7 Kilowatts
(KW). To calculate the current required by the motor divide the Watts by the Voltage
(either 115 or 220). So a 5 hp motor will draw at least 3750/115 = 32.6 amps on a 115V
circuit, or 3750/220 = 17 amps on a 220V circuit. This assumes that the motor is 100%
efficient, which it isn't. House hold wiring usually has 2 types of circuits - the 110V (also
referred to as 115V or 120V) used for most electrical lighting and small appliances. The
maximum a 115V circuit will be rated for is about 30 amps. Heavy appliances like an
electric dryer, water heater, and stove all usually run in a 220V circuit. So you see that a
5 hp compressor will require a 220V circuit in your shop. If you don't have one, they are
quite inexpensive to have added as long as you have some spare slots in your circuit
breaker panel.
1. The horse power (hp) rating of the electric motor (i.e.. 5 hp., 10 hp., etc.). Lately, the
marketing departments of the various compressor manufactures have been playing games
with the hp ratings. It seems that they are rating them based on the maximum current the
motor will draw (when starting) and not the running current. So beware. 1 hp is about
750 Watts. So a 5 hp motor should consume about 5x750=3750 Watts or 3.7 Kilowatts
(KW). To calculate the current required by the motor divide the Watts by the Voltage
(either 115 or 220). So a 5 hp motor will draw at least 3750/115 = 32.6 amps on a 115V
circuit, or 3750/220 = 17 amps on a 220V circuit. This assumes that the motor is 100%
efficient, which it isn't. House hold wiring usually has 2 types of circuits - the 110V (also
referred to as 115V or 120V) used for most electrical lighting and small appliances. The
maximum a 115V circuit will be rated for is about 30 amps. Heavy appliances like an
electric dryer, water heater, and stove all usually run in a 220V circuit. So you see that a
5 hp compressor will require a 220V circuit in your shop. If you don't have one, they are
quite inexpensive to have added as long as you have some spare slots in your circuit
breaker panel.
2. The size of the storage tank. These are rated in gallons and come in all sizes. The rule of thumb here is, the bigger the better. Theoretically the more air you can store, the longer your tools will run without the compressor kicking on. The 60 gallon vertical tanks are becoming quite popular.
3. The "cubic feet per minute" (cfm) of air that the compressor can deliver at a given pressure. Most compressors are rated by the cfm. they can deliver at 40 and 90 psi . Again, you want the largest number you can get at 90 psi.
The rule of thumb would be the bigger the better. The bigger the hp rating of the motor the more work the compressor can do. The more cfm the compressor can deliver the better many of the tools will work. The bigger the accumulator is the longer the compressor can provide the air that you want.
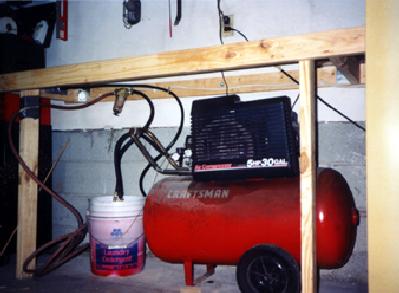
You should look at air consumption rating the various tools you expect to drive with your compressor. Find which one consumes the most air, and multiply that value by 1.5. So, if you have a tool that is rated at 9cfm at 100psi, you would like a compressor capable of delivering 9*1.5=13cfm or better. However, you may find that you can't afford that much compressor. In that case, buy what you can afford, but I don't recommend anything less than a 5hp. (220V) 30 gallon compressor. I have 5 hp. 30 gal. Sears Craftsman oil lubricated compressor. I wish I had the 60 or 80 gallon accumulator when I'm using some of my tools like my blast cabinet, a dual action (DA) sander or a die grinder. These really eat up the air.
When using your air tools, it is normal for the compressor to run. However, it should not run continuously. Based on information from TP Tools and Equipment's web site, they recommend that the compressor only run 2/3 of the time. So if you are using an air tool and the compressor can't keep up with the demand and shut off while your are working, only work for about 5 to 10 minutes, then let the compressor catch up, shut off, and cool down for a few minutes. I find that when using almost any air tool, after 5 or 10 minutes, I need a short break. Whether it is to reposition a part in the blast cabinet, change the paper on my DA or in line sander, or merely reposition myself for a better angle to reach what I'm working on. So this really isn't a big problem for me.
My compressor is mounted under a work bench in the back of my shop. Consequently there isn't a lot of air flow around it. To help cool it, I hung a large box fan behind the compressor to blow air over the cylinders.
Most compressors will come with 1/4" air line. Do yourself a favor and throw that away. Purchase some good 3/8" rubber hose (not the orangish plastic hose - it is very hard to work with when the temperature is below 60 degrees F.). There are line losses associated with both the diameter and length of the air hose, similar to electrical wiring. For an example, at 90psi a 1/4" hose will loose 29#s over a 25' run, and 39#s over a 50' run; while a 5/16" line will loose 10#s in 25' and 16#s in 50'. In my garage, I usually have 50' of 3/8" air hose hooked to my compressor. When I need to work on a car in my driveway, I add another 50' of hose. So, no wonder I'm having problems with my impact wrench at the end of 100' of 3/8" hose! While the line losses should be less than 16# per 50' (the value for 5/16" hose), I'm probably loosing at least 24# with the 100' of line. I really need to plumb my garage so I can shorten my air hoses.
While on the subject of hoses, I suggest that you plumb your shop with metal pipe, and install plenty of air outlets and several moisture traps. For information on how to plumb a shop for air. What ever you do though - DO NOT USE PVC PIPE to plumb your air line! Using long air hoses is the same principal as using long extension cords for electrical work, the longer the cord, the bigger the wire must be. You're better off wiring your garage, and using short extension cords due to the electrical losses in the cord.
Sandblasting equipment basics:
There are 2 main types of sandblasting equipment, the siphon feed and the pressure feed.
The siphon feed is the cheapest. The air is applied to the
 gun, and as air flows through the gun, it creates a partial vacuum which will "pick up"
some of the sand. The sand flows into the air stream and out the end of the gun. You can
purchase a siphon gun and sand pick up tube from about $20. Some places like Sears sell a siphon system that includes a storage
container for the sand. These are more expensive, from $50 to $100. However, all you
really need is the gun and pick up tube. You can purchase a heavy duty bucket for about a
dollar at yard sales or you may have some laying around that were used to hold pool
chemicals or bulk laundry detergent. Place the pickup tube in the bucket and fill the
bucket with sand; connect the an air hose to the gun and you're ready to start blasting.
gun, and as air flows through the gun, it creates a partial vacuum which will "pick up"
some of the sand. The sand flows into the air stream and out the end of the gun. You can
purchase a siphon gun and sand pick up tube from about $20. Some places like Sears sell a siphon system that includes a storage
container for the sand. These are more expensive, from $50 to $100. However, all you
really need is the gun and pick up tube. You can purchase a heavy duty bucket for about a
dollar at yard sales or you may have some laying around that were used to hold pool
chemicals or bulk laundry detergent. Place the pickup tube in the bucket and fill the
bucket with sand; connect the an air hose to the gun and you're ready to start blasting.
A pressure blaster is a heavy steel container that holds the sand. The air is split and sent
to the storage tank and then to the bottom of the tank where the sand comes out. The air
pressure in the storage tank pushes the
 sand out of the tank and into the air stream. Resulting in the sand containing more Kinetic
energy. These pressure blasters will strip more paint and rust off of an item faster then the
siphon types. (Note: I don't suggest you try and sandblast thin sheet metal, like a hood or
fender as the force of the sand hitting the metal will warp the metal.)
sand out of the tank and into the air stream. Resulting in the sand containing more Kinetic
energy. These pressure blasters will strip more paint and rust off of an item faster then the
siphon types. (Note: I don't suggest you try and sandblast thin sheet metal, like a hood or
fender as the force of the sand hitting the metal will warp the metal.)
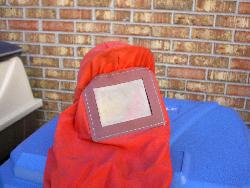
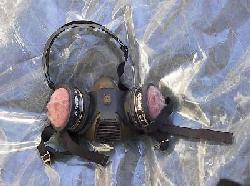
When using the pressure blaster you will need a good hood with replaceable face pieces. I also suggest wearing a respirator.
 Ways to blast:
There are also 2 ways to sandblast, what I'll call "open" and "closed" systems. The open
system is where you lay a piece to be blasted on the ground and blow sand at it. The
problem with this, is that you don't recover the sand. The closed system is where you
place a part in a cabinet, and blow the sand out of the gun in the cabinet. Most blast
cabinets use a siphon gun to suck the sand form the bottom of the cabinet into the gun
where the sand is mixed with the air stream to propel the sand out of the gun. These blast
cabinets are great as they constantly recycle the sand. When using a cabinet, you will need
some sort of a vacuum or fan to blow/suck the dust out of the cabinet. The cheaper
cabinets usually require you to provide the vacuum. More expensive cabinets will provide
a blower on the back of the cabinet to draw out the dust.
 Rick says:
When shopping for a cabinet, buy the biggest you can afford. There is no such thing as too
big! The arm hole sizes are very important, even more so in larger cabinets, as the larger
holes give you more mobility and reduce strain.
While I agree with Rick, I purchased a smaller, plastic, portable cabinet. I didn't have the space in my garage to put a nice large cabinet.
Media: There are all kinds of blasting media, sand, black blast, walnut shells, glass beads, baking soda, etc. The type of media you use depends on what you are trying to blast and what you want to accomplish. I don't claim to be an expert on the subject but here is some of what I know about it. I usually use coarse sand purchased at a local automotive paint supply house for about $10 per 100 pounds, very cost effective. Be very careful with sand - it causes silicosis (dust disease - a form of lung cancer). I always wear a 2 canister face mask when using sand in either my blast cabinet or in the open. Black blast supposedly isn't as bad for your health but a little more expensive. These two will be the usual media that you use for thick metal parts and trying to cut off paint and rust.
Other media are:
Glass Beads - Most popular abrasive for general parts cleaning and automotive
use. Great for aluminum like carbs, manifolds, alternator housings, etc.
Walnut Shells - Popular for use on glass because it won't scratch. Also used on aluminum.
Silicon Carbide Abrasive - stays sharper and lasts longer than any other abrasive. Great for heavy metal parts.
Steel Grit Abrasive - Leaves a very smooth finish. Extremely fast cutting on rusty metal.
Aluminum Oxide - High-quality abrasive does not dull quickly. Leaves a smooth textured finish with no pits or burrs.
(For more detailed info on different media check out the media guide.)
Back to Serge's the questions, to which Rick replies.
Unless you have lots of time to spare, this is job best left to a pro. To do the job quickly and efficiently, you will need a 10 HP compressor (minimum) and a pressurized blast pot. You can do the job with a 2 or 3 horse compressor but it will take several (many) hours and the job will only be a fraction of the quality of the pro's. The sand should be as fine as you can find, the courser the sand, the deeper the pit it leaves in the metal. The finer the sand the slower it cleans, but it does less damage to the metal. There is some give and take here were you have to give up speed for less damage or give up texture for speed. The nozzle size is a function of the compressor, the bigger the compressor, the bigger the nozzle you can use and thus the faster the work goes. I use a 3/8 nozzle with 100 grit sand, but I have a 60 HP compressor. To do the complete frame and fender wells you will probably need 2-3 hundred pounds (4-6 bags) of sand.I have to agree with Rick about Serge sending out his chassis and big items. Blasting is very very slow work!!! So for a frame, or other big items I wouldn't waste my time. I will send them out to be blasted. I find it very cost effective. I paid $125 (in 1997) to have the chassis for my Bricklin blasted plus $50 for the "U-haul" truck I had to rent for the day to transport it." It was done in about 5 hours. It would have taken me many, many, days to do it.Soda is not a good choice here as it does not remove rust, just paint. A good alternative is to have the frame 'pickled'. To do this the frame is soaked in a vat of acid, then rinsed and neutralized. This cleans the frame not only outside but inside as well (if there are holes for the acid to get in). If this is done by a pro shop, there is no extra damage done and only the rust is removed. We have this process done every day for used parts that come through our shop. I don't know if there is a shop in your area but check the yellow pages. Hope this helps."
I have a 5 hp, 30 gallon (oil lubricated) Craftsman compressor that I use to drive all the air tools.
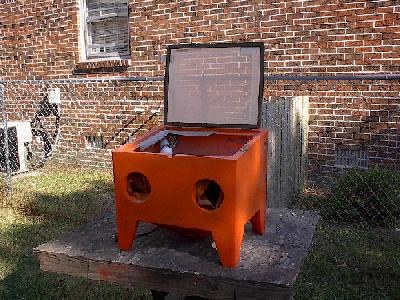
I have one of the orange plastic blasting cabinet from Harbor Freight. I purchased it for about $100. When I use my blast cabinet, I put it on a Black-N-Decker shop mate portable table with a plywood top in my back yard also. When I've used it in the garage, I got sand dust all over the floor, which makes the smooth concrete very slippery and the dust is almost impossible to sweep up.
I'd also recommend a couple of modifications to the plastic cabinet. I had problems with the sand pickup tube floating up out of the sand. So I cut a couple of strips from some aluminum flashing, bent then into a "U" that fit over the pickup tube and pop riveted the "U"s to the cabinet. Now the pickup tube stays in place. The cabinet comes with a piece of PVC pipe/tubing to come out of the cabinet and connect to a vacuum. I had a lot of problems with this tube falling inside or outside of the cabinet, or just moving all around in the cabinet. Here too, I made some "U" out of flashing and pop riveted them around the dust tube.
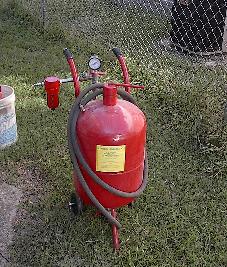
I also have Harbor Freight's 40# a pressure blaster. But blasting takes time. I do a lot of blasting of all kinds of parts. I use my blast cabinet for small parts, and the pressure blaster for blasting parts that won't fit in the cabinet. I also have a siphon blaster with the open bucket to store the sand which I don't use anymore.
When I use my pressure blaster I string a piece of rope diagonally across the corner fence
in my backyard. Then I attach a 6 mil plastic drop cloth
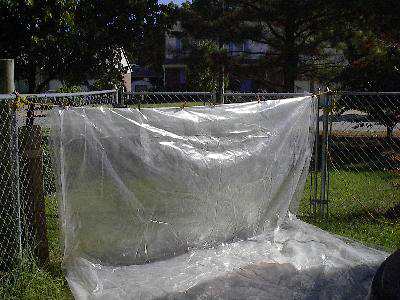 (about $6 from K Mart) to the rope with clothes pins. This gives me a back drop for the
sand to hit, and a floor to collect the sand. I can recover about 90% of what I shoot.
Depending on the part I'm going to blast, I will lay a piece of plywood or cardboard on the
bottom of the tarp, so I don't poke holes, in plastic, with the part.
(about $6 from K Mart) to the rope with clothes pins. This gives me a back drop for the
sand to hit, and a floor to collect the sand. I can recover about 90% of what I shoot.
Depending on the part I'm going to blast, I will lay a piece of plywood or cardboard on the
bottom of the tarp, so I don't poke holes, in plastic, with the part.
With the pressure blaster, I can blast for about 45 minutes to an hour, by regulating the sand output, before I have to refill the tank. I scoop the sand up off the plastic tarp in a coffee can, and sift the sand through an old piece of screen as I put the sand back into my storage bucket. Then I fill my blaster from the storage bucket and sift the sand again. This way a 100 pounds of sand lasts quite a long time.
HF's pressure blaster's weakest link is the ball valves they provide. They appear to be quite cheap. I've had 2 failures with the original valves. On the first valve, the handle broke off while I was assembling it. Then the valve at the end of the blasting hose (to turn off the flow of pressurized sand) died after a couple of hours of use. It turns out that the sand actually blasts the ball valves as the sand is going through. This blasting action ate a hole right through the side of the ball valve. I found that if you are careful about how you turn off the flow of sand the valves last a lot longer. I turn off the sand feed valve at the bottom of the tank first. Then I turn off the air to the blast hose, and finally I turn off the air to the pot (if I'm not going right back to blasting). The water separator was missing the nut that holds the drain petcock in place and I didn't call HF right away. I've since called them, but I had to pay $20 for a replacement separator.
I would recommend that you make a modification to this pressure blaster if you should get one. They supply a short union to connect the dryer and pressure gauge to the unit. Go to the hardware store and purchase a slightly longer nipple. You can't get the gauge, dryer, etc. on or off with the handles attached if you don't. This makes maintenance a real pain.
In about 2000, I purchased a "dead man" control nozzle, for the pressure blaster, at
Northern Hydraulics for less than $20. (Note: this model has been discontinued but they
have a new one, it's called Abrasive Blaster Deadman II Nozzle Kit. Eastwood has one also.)
This nozzle requires that you hold it pressed to
feed the pressurized sand out the end of the nozzle. The nice thing about this nozzle, is
that you don't have to turn
 off all the valves to stop blasting. Simply let off the trigger, and the air and sand stop
flowing. This works pretty well until the sand gets damp. Then the nozzle plugs up with
the wet sand. I've had to take it apart a few times to unclog it. This is also true for the
blast cabinets. You should have an additional dryer at the pressure blaster (my HF. unit
came with one) or at the blast cabinet.
off all the valves to stop blasting. Simply let off the trigger, and the air and sand stop
flowing. This works pretty well until the sand gets damp. Then the nozzle plugs up with
the wet sand. I've had to take it apart a few times to unclog it. This is also true for the
blast cabinets. You should have an additional dryer at the pressure blaster (my HF. unit
came with one) or at the blast cabinet.
Unfortunately, this nozzle being so inexpensive, is relatively cheaply constructed. It has a small rubber tube inside that is pinched by the trigger to shut off the air/sand flow. They don't tell you this, but I suggest that when you aren't using it, clamp the trigger in the "on" position to keep the pressure off the rubber tube. After a short time, the rubber tube ripped, where the trigger presses on it. I was able to turn the tube over and get a fresh piece of rubber to pinch. I just purchased a similar nozzle (Sept. 2002) on from Harbor Freight. Theirs has a wire clip that will hold the trigger and clamp open so the rubber tube shouldn't get torn as quickly.
In closing: Probably the most over looked tool in your shop is your air compressor. If you have an oil lubricated compressor, be sure to change its oil at least once a year.
Remember, the longer the air hose and the small the diameter, the less air you will have available at your tool.
One note of caution: as a rule don't sandblast car body parts as they are quite thin and will warp!
I love both the cabinet and the pressure blaster!!! Which I use depends on what I'm blasting. Small parts go in the cabinet, for large items I use the pressure blaster. The pressure blaster does a much better job and a lot quicker than the plain siphon gun in the cabinet, but the cabinet is a lot cleaner. I suggest that you keep your eyes out for those heavy plastic buckets with lids (I mentioned above), these make great storage buckets for your sand or other media.
If you are a real do it youselfer (DIYer), you can build a blast cabinet out of plywood.
Rick sums things up:
On media, there's not much more to say other than the white stuff will kill you, the black stuff doesn't work as good, the other stuff is real expensive! Actually aluminum oxide 60-120 grit works real good in cabinets, stays sharp a long time and doesn't beat up the metal as bad. The downfall is that a 50# bag is 7-10 times the price as the cheap stuff. I use 100 grit aluminum oxide, but I buy 1000# at a time so I get a good price, about .30/#. Expect to pay between .55 & 1.10/# for single bags. Glass bead will leave a smoother finish than Alox but GB peens the pores closed. Alox opens the pore so paint and other things stick better due to better 'keying' .You may want to check out either of the following web site for more information on equipment, media, etc.The use of silica sand in cabinets, particularly suction feed is not recommended as the large grain size is hard to suck through the hose and thus you get less work done. Alox is smaller, finer grit and tends to work faster due to more volume coming out the nozzle.
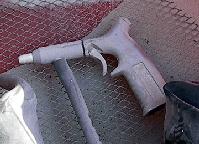
I am up to my arms in a blast cabinet for a couple of hours every day, and have found the one most important factor is nozzle and air jet size. These must be small enough that you don't run the compressor out of air. If the compressor can't at least keep up you are wasting your time. In a suction cabinet the most important parts are the sand pickup and gun. The pick up MUST have an air inlet to let some air into the sand hose to aerate it. This should be adjustable and are available at sand blast supply hoses. The most important item is the gun, throw the cheap one away and buy a solid brass or aluminum one from a supplier. These guns come with a replaceable air jet and carbide nozzle, these have to be rotated every few hours to even out the wear. I get about 20 hours of use out of an airjet and nozzle and after two sets I toss the gun (worn out). The guns cost about $45 and the nozzle about $25.
For a pressure pot 2 items, first is nozzle size, use the smallest you can get. The more velocity you have the better, and second I pitched the ball valves in the sand line and replaced them with all stainless gate valves. Ball valves all have nylon liners that the sand just blows through, the gate valve lasts much longer and are easier to control sand flow. They usually take a couple of turns from full open to full close so you have much more control than a ball valve.
TP Tools & Equipment
7075 Rt. 446
Canfield, OH
(800) 321-9260
Hope you found this article usefull.
John
Return to the Index of Tech. articles
To email me with comments or questions.